Showing posts with label Paint. Show all posts

Saturday, October 22, 2011

Finally got to paint!

Well, I have been following Sharon Tomlinson at Norah's and I have been intrigued by the process she is using to paint over magazine pictures to get a completely different picture.  I have a huge stack of cardboard from work.  These are 81/2x11 because they are the cardboard at the bottom of the packs of forms we use at work.  Usually we just throw them out, but I started saving them and in a month had more than I will ever use.

Anyway, I pasted pictures on the cardboard and then painted over it.  I have to say it is not as easy as she makes it look.  I will need to practice and practice some more to ever be satisfied with this artform, but it was pretty fun and I had no expectations, so I could just have fun!  At least I finally got back to the paint table.  I think tomorrow I will try another.  But in the meantime, here's what I did:


Can you tell that I started with a close-up of a man's face?  I can, but I just wonder if anyone else can.  She is certainly no beauty, but I am pleased with her.  I really enjoyed the collage of her hair.

Let me know what you think about her, won't you?
Enhanced by Zemanta

Monday, August 1, 2011

Watercolors to go -- from Tip Junkie

Here is a wonderful tutorial for a wonderful idea!  This is something I want to try myself because maybe if I have this handy, I will be able to grab those moments when I feel inspired.  As it is, those moments are simply lost while I try to find things, or set up a place to work, or something. 

This is a great handmade gift to give to any children on your Christmas list, too.  I know I would have loved to receive one of these when I was younger.  Think how many hours of use this little kit will get from the busy and creative imagination of a child.

Hope you like it.  Hope you try it.  If so, leave me a note about the process, won't you?  You can visit the original site here to check out other ideas.

_________________________________________________________________________________


Every winter my dear friend Catherine Newman gives my kids the most inspired gifts- both handmade and boughten.  Last year she gave Ava a fantastic book called An Illustrated Life, a book about illustrated journaling and sketchbooking and it was a huge source of inspiration for her.  When I get her permission, I will post some things she has been working on, but for now I will share with you a little gift that I am currently making for her as she fills her personal sketchbook with beautiful and funny and original work of her own.  There was an idea for this in the book that an artist shared that I have changed a bit but it will allow her to carry water colors with her and as long as she can find some water (usually not difficult) she can transform her black line drawings into something even more spectacular.  And, it's easy, to boot.
  1.  a metal tin (I used a tin that a pair of scissors came in, which was a perfect fit for the "fantastix") polymer clay (sculpey or fimo- go for the soft type).
  2. tubes of watercolors (I went for the cheap type from Michael's for this first try but you could use fancy ones)
  3. Coloring tools such as "fantastix", which are inexpensive and you can find at any art or craft store. They are basically pens without the ink.  The body is filled with a sponge that holds water so you fill it with water and then can use it with the water colors without having a jar of water for your paintbrush.  You could even watercolor in the car!
  4. White metal paint OR a piece of white plastic cut from a tofu or yogurt container that is large enough to fill (or mostly fill) the top of the tin (this is for mixing colors- you want white for that).
  5. A tube of lip balm (you'll see why).
How to make it:
  1. Take one pack of white polymer clay and break in half.  Roll each half into a snake as long as your tin.

Smoosh them so they are flattened along both long sides and then take your lip balm and press 6 wells into each smooshed snake of clay (use the top of the lip balm that is flat).


2. Follow the manufacturer's directions and bake the clay inside of the tin.  After this cools, you can fill the wells with paint.
3. Fill the wells with paint.  Tap the whole thing to flatten the paint into the wells, or use something (like a paintbrush) to flatten it.  Allow this to dry and it will be ready to use.


4. Paint the top of the lid with white metal paint or glue in a piece of white plastic to provide a white area to mix colors.

5. Now it is ready to go.  If you need to, tie a piece of string or use a rubberband to keep the lid secure.  

If you can't find a long tin like this one, you could always just carry the color sticks in your pencil/pen bag.


Enhanced by Zemanta

Tuesday, September 28, 2010

Tuesday Tutorial -- Paper Mache Birds

Here is the tutorial on making paper mache birds. I cannot wait to try these. I simply love birds and I don't know why. These look like they are simple and fun to make. If you try these, let me see how yours turn out, okay?


This is from that artist woman. I hope you enjoy the tutorial!! Please click over to her blog and leave her a nice comment, won't you.  Her blog is very interesting and fun.


-----------------------------------------------------------------------------------------------------------------


I guess I have a bird theme going here.


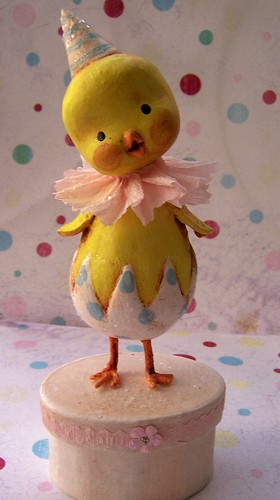
These are some cute paper mache birds we made recently.


They have wire feet which allow you to clamp them on an edge like a flowerpot or piece of driftwood or have them free standing.


MATERIALS REQUIRED:
- newspaper
- tape
- paper towel
-  reg. white school and tacky glue
- water and recycled container
- thin cardboard from a cereal box
- wax paper
- acrylic or tempera paint
- fine markers
- sealer like Mod Podge (optional)
- med. gauge wire
- embroidery thread or yarn


Take a quarter sheet of newspaper and crush into a pear shape.


Tape into place.  You can twist out a beak shape, click on this photo to enlarge to see this.


Cut some paper towel into strips about 1/2 an inch wide or so.  Pour some white school glue into a recycled container and add water in a 1 to 1 ratio. Mix well. Dip the strips into the glue mixture and start covering your bird.

With paper mache you want to overlap your strips for strength and smooth them down as you go.  Use a few dry strips to soak up excess glue.  That way your bird will take less time to dry you just want it moist not sopping.


Leave to dry in a warm place overnight...turn once to ensure even drying.


Out of thin cardboard from a cereal or cracker box cut out a wing shape...I used a teardrop shape.  Cut out a tail shape as well.


Take the cardboard shapes and cover in a coat of paper mache.


Leave to dry.

Paint with acrylic or tempera.


We used a basecoat first and then added additional color on top.


For the feather and eye detail you can either paint it in with a fine paintbrush or use fine sharpies after the paint has dried.

Younger kids to better with the markers.


If you want a shiny coat you can add a coat of mod podge but you might want to wait until after you add the legs.  This way it can stand up while drying.


To make the feet take piece of wire about 16 inches or so.  I don't what gauge this wire is as the label was missing but it's soft enough to bend with your fingers but firm enough to hold the shape without collapsing.

Make a foot shape with 4 toes and then twist the 2 ends of the wire together to form the leg.


Trim them down and bend in the knees.  Remember a bird's knee bends backwards.


I like the look of the silver foot but I wanted to add some color to the legs so we wrapped them with embroidery thread.  You could also use yarn.  Take the end of the thread and loosely wrap from the top of the leg down, double back and wrap tightly now.

When you reach the top knot off.


Using an awl or a knitting needle punch holes for the legs.


Put some tacky glue on them.


Push the leg thru the glue into the hole (remember the knees are backwards).

Add some more glue if needed.


Let dry. 


Here is the one my 7yr old made.


That's it.They look pretty realistic once the legs are on.


Enhanced by Zemanta

Wednesday, September 22, 2010

Artist Block -- Who me?

In case you haven't noticed, I went on vacation and apparently never returned.  I am having trouble getting myself back into the swing of things.  I haven't been keeping up my blogs, I haven't been doing any art, I haven't been reading good books or watching any good movies.  I just seem to go through my days in some sort of fog, performing necessary activities only.  I work, I pay bills, I walk the dogs, etc.  The only thing I find any time for is to sit in front of this computer.  I look at everything, it really doesn't matter the subject matter.  The computer is a treasure trove for trivia driven information and the computer can eat up large blocks of time. 


They say that acknowledging the problem is the first step, so here goes.  I am forcing myself to update all of my blogs today.  I am committing to keeping them updated at least twice a week.  I will spend no more than 2 hours a day just "playing" on the computer -- mostly I like to read about setting up websites and such.

I am going to make myself set aside a specific block of time each week to work on my art projects.  If I still cannot get going, then I will make myself sit there at my craft desk for the allotted time.  I want to paint, I just cannot get myself to start doing it, so maybe that will help.


So, with all of this in mind, I received an email today that resonated with me.  I am posting some of it here in case you are struggling with any of these issues.  I hope you find it helpful.

-----------------------------------------------------------------
14 Days of Art Prompts

   
1. Be inspired by your breakfast: Use the
colors from your cereal box to start your next piece.


2. Use a mirror: Place a mirror on your work
surface and make a painting by looking into the mirror.


3. Draw without looking: Draw a still life in a
journal with your eyes closed.


4. Make a book: Google book binding and try
a new binding technique.


5. Add glitter to something: Try German glitter
glass or cut-glass glitter for a vintage look.


6. Create a Packing Tape Transfer: Place a piece
of packing tape over a photocopy image and rub
off the paper backing with a wet sponge.


7. Use old supplies: Use a supply in your studio
that you haven’t used in at least 6 months.


 8. Make a stencil: Take a picture of your
favorite pet (or person) in profile and make
a silhouette stencil.

9. Tear it up: Grab an old book and tear it up.
See what you can build/cover/create with the
pieces.

10. Fold it up: Try a piece of origami, search
online for directions. Try it with vintage sheet
music or even fabric paper.

11. Go opposite: Use the colors on the opposite
side of the color wheel from your go-to palette.

12. Work big: Grab a piece of paper at least twice
as big as you usually work on, and stretch yourself.

13. Work small: Sharpen your pencils, and grab your
.005 Pigma® Micron pens and magnifying glass, and
work small.

14. Carve it out: Take a moment to make your own
artist stamp by carving an eraser with a craft knife.


Enhanced by Zemanta

Friday, May 7, 2010

More on my prayer dolls

I have been working on my prayer dolls and they really are looking pretty.  I stayed up until after 1AM the other night painting on them and I have to say I had a ball.  The next morning, I took pictures to show my progress.

Here they are:

I still lack painting their hair and adding collage items so I can cover them entirely with a sealer.  I think they are really cute and I plan to make many more.

 For my friend, Rebecca

 For my sister

 For my friend, Kenita

 For my friend, Elizabeth

and hopefully, this one will be for me!
Reblog this post [with Zemanta]

Sunday, March 14, 2010

Here is a post I found on The Polka Dot Pixie and thought it was a perfect repost for Easter.  So, here it is complete with instructions and pictures to make the cutest little chick.  Make several and give them to your kids, your neighbor's kids, your grandkids, whatever.  Maybe just make some for yourself.  This is so cute!

Please visit The Polka Dot Pixie blog, too, because there are really great posts to be found there!
Happy Crafting!  Happy Easter!

__________________________________________________________________________________


  In case anyone wanted to sculpt their own little party chick ... here is the way I made him. To begin, you will need paper clay, sculpting tools, water, a small flat paintbrush and a Styrofoam egg and ball, paper tape and 20 gauge floral wire.
Begin by twisting and shaping wire into bird feet and legs. Cover with paper tape.

Soak Styrofoam egg in water and then cover with paper clay, smoothing and shaping with your hands and paintbrush. Insert legs into bottom of egg, and pose in any fashion you choose. Indent Styrofoam ball with smooth barreled paint brush handle or a smooth barreled pencil. Shape Styrofoam to create a head shape.
Soak Styrofoam head in water and cover with paper clay forming a smooth surface with hands and brush.
To create the face, form two small balls and 2 small cone shapes. Flatten balls in to "puffy pancakes" and attach to head, one on each side, to create cheeks.
Attach cone shapes to create beak. Smooth face with paintbrush and water. Shape beak with sculpting tools and paintbrush to create a smile.
Using paper clay, create a small barrel shaped neck to attach head to body. Smooth with paintbrush and water.

Adding a wire here also adds extra strength to your piece. You can tilt the head to the side to add some personality.


Shape wings and attach to chick body with paintbrush and water.


I didn't take pics of the painting process, but I recommend that you let the chick dry for a least week before painting. I always gesso paper clay before painting with good quality acrylic paints, and finish the pieces up with a matte acrylic sealer, which is then antiqued with watered down burnt umber paint. After I attached this chick to a hand painted paper mache box, I added just a touch of glass glitter here and there to give him a little sparkle.


I hope you have fun with your creations! If you decide to make one I'd love to see the finished pics!

Here is a link to the original post
Reblog this post [with Zemanta]

Why Are Orcas Attacking Boats?

Recently I have been reading articles and news about Orcas attacking boats and causing quite a bit of anxiety.  Since these whales hunt in p...