This is a copy of part of a blog entry from Amarettogirl. I just discovered her blog this morning and I am blown away. Her header is fantastic, but this entry is really exceptional. I have only posted a small part of the entry and you will have to go to her site and read the rest. The finished doll is showcased there also, so if this is interesting to you, you will need to click over to see the results. Believe me it is well worth the trouble of clicking. I will be anxiously awaiting more entries in her blog and I believe you will also.
-------------------------------------------------------------------------------------------------------------
This is just an excerpt from the blog:
My mind was set from the beginning that my doll would be a sad, sullen girl - this I knew.
So check out my early stages and as my students told me all along the way the images can be freaky...
So having made dolls before and truly enjoying the spirit of allowing a narrative to develop between me, the process and the matter (which in this case of art-making is the doll), I allowed much to be developed intuitively as I went. I also based much of my artistic design choices on where my heart was at that moment...[read more]
Where I frequently fall down various "Rabbit Holes" by reading the news online. Sometimes this leads to my ranting and sometimes it leads to very interesting posts.
Tuesday, December 6, 2011
Saturday, December 3, 2011
More on my handmade Christmas ornaments!
I finished making 12 of the lovely crepe paper ornaments. I used three colors, red, green and white. I really like the way they turned out, but I tried to add glitter to the red ornaments and I don't much care for it. I think I will have to remake four new red ones and just leave them plain.
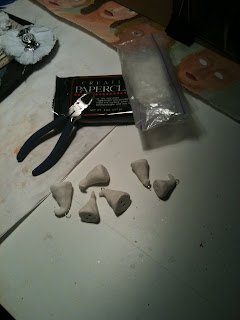
I started making new Santas from paperclay. The ones I made a couple of years ago are flat. These will be more dimensional. I just started them the other day and am anxiously awaiting their drying. Once they are totally dry, I will begin to paint them and add the ribbon legs with beads for his boots. I can't wait to see them finished.
I loved the first batch of flat Santas, I will love this batch of 3-D Santas, too.
I'll post pictures as I work on them so you can see what I am doing. So far, the only thing you need to make these is paperclay, paper clips, a wire cutting tool, a tool for making holes in the bottom to attach the legs, and some paint. I intend to use dimensional paint to make the beard and mustache, as well as to decorate Santa's hat. You will also need som thin ribbon for his legs.
Here he is so far:
Related articles
- 7 Handmade Ornaments {Great Gift Ideas} (makingtimeformommy.com)
- Beautiful Handmade Christmas Ornaments (craftjournal.wordpress.com)
- A Peek at the Tree Filled With Handmade Decorations (renakaylor.wordpress.com)
- Greeting Card Ornament (folkhaven.wordpress.com)
- Undead Holiday Decor - The Zombie Christmas Ornaments Make for a Very Scary Christmas (TrendHunter.com) (trendhunter.com)
Thursday, November 24, 2011
Working on Christmas Tree Ornaments this year!
I am diligently working on making new Christmas Tree ornaments this year. I hate putting up a tree, but I have managed to convince myself that it is okay if all the ornaments on the tree are handmade. One year I made snowflakes from toilet paper tubes and glitter (they are so beautiful!!!!), the next year I made Santa ornaments out of paperclay and ribbon. They were time intensive but worth the effort. I love hanging these on my tree. This year I am making crepe paper ornaments to hang. I am having fun and they are getting done. I hope to be finished soon, but will go ahead and put up the tree without them for now. I also have an idea for a garland that will be so beautiful. May not get that one done this year, but I could start now for next year's tree.
Here are some pics of my work in progress:
I still have to put the glitter on them, but I want to do that after all are made because it will be sooooooo messy. I'll have to go out to the garage to do that part. They are pretty cute, huh?
Here are some pics of my work in progress:
I still have to put the glitter on them, but I want to do that after all are made because it will be sooooooo messy. I'll have to go out to the garage to do that part. They are pretty cute, huh?
Happy Thanksgiving to you all!
Related articles
- My Christmas Tree! (kristengregory4eva.wordpress.com)
- DIY: Wine Cork Christmas Ornaments (wineandcork.wordpress.com)
- All That Shimmers (spoolandspoon.wordpress.com)
- Oh, Christmas Tree (becauseithinkican.wordpress.com)
Friday, October 28, 2011
Christmas Craft Ideas - Christmas Angel Ornament
Christmas is less than 2 months away. It's past time to be doing your shopping, and decoration making. I found this lovely angel pattern to crochet and felt it would be quick enough to make that I would put it up here for those last minute crafters. These little angels would really be cute included in your Christmas cards you mail to friends and family far away. They could be hung on the tree to remind the recipients of you. I found this pattern on Craft Town and I invite you to visit this site for more wonderful ideas for crafts.
==========================================================================
All Rights Reserved
Fill your Tree with hand-made Ornaments! This Christmas Angel is a simple and easy ornament to make. Great for Gifts especially sending them through the mail for family that are a distance from you.
Materials: Autn Lydia's Classic Crochet thread -Size 10; Red, Green, and white Thread. Hook Size 1.8 mm, and Fabric Stiffener.
Ch = Chain SL = Slip Crochet
SC = Single Crochet HDC= Half Double Crochet
DC = Double Crochet
TR = Treble Crochet
R = Red Thread
G= Green Thread
W= White Thread
Dress
R-Base: Ch 9.
Row 1: 8 SC, Ch 1, Turn.
Row 2: *SC, Ch 3, Rep across from, Ch 1, Turn.
G-Row 3: SC across in sc sps, CH 1, Turn.
Row 4-5: 8 SC, Ch 1, turn.
Row 6: 1 SC, Dec 1, 4 SC, Dec 1, 1 SC, Ch 1, Turn.
Row 7: 6 SC, Ch 1, Turn.
R-Row 8: *1 SC, Ch 3, Rep across from *, end with SC, Ch 1, Turn.
Row 9: SC across in SC sps, CH 1, turn.
G-Row 10: 6 SC across, CH 1, Turn.
Row 11: * 1 SC, CH 3, Rep across from *, CH 1, Turn.
Row 12: * 6 SC in CH 3 sp, SL in next SC sp, Rep across from * SC in last sp, CH 1, Turn.
Row 13: CH 6, SC in 7th SC (not CH) from hook, *CH 5, SK 5 sps, 1 SC in next SC, Rep 2 times from*, CH 6, SK 6 SC sps, 1 SC, Ch 1, Turn.
Row 14: 4 SC in CH 6 sp, * Ch 3, 1 SC in next CH SP, Rep 2 times from *, Ch 3, 4 SC in next sp, CH 1, Turn.
Row 15: SC in 2nd sc from hook, SC, *6 SC in CH 6 sp, SL in SC, Rep 2 times from *, 6 SC in CH 3 sp, 1 SC, SL, CH 1, turn.
Row 16: SC in 2nd SC from hook, CH 3, SK 2 sps, 1 SC, * CH 5, Sk 5 sps, 1 SC, Rep 2 times from *, CH 3, SK 4 sp, SL in last SC, CH 1, Turn.
Row 17: In CH 3 SP (1 SC, CH 3 and rep 5 times), * In CH 5 sp (1 SC, CH 3, Rep 7 times) repeat from * 2 times, In Ch 3 sp (1 SC, Ch 3, Rep 5 times) tie off.
Wings
W - Base: Ch 7, Sl to 1st CH made, Ch 1, turn.
Rnd 1: In CH sp (5 SC, 3 HDC, 1 DC, CH 3, 1 DC, 3 HDC, 5 SC,) SL to 1st SC made, Ch 1, Turn.
Rnd 2: 6 SC, 4 HDC, in CH 3 sp (3 DC, 1 TR, CH 3, 1 TR, 3 DC), 4 HDC, 6 SC, Sl to 1st sc made, CH 1, Turn.
Rnd 3: 13 SC, in CH 3 sp (5 SC, CH 2, 5 SC), 13 SC, SL to 1st sc made. Tie off
Repeat Wing 1 more time.
Head
White- Base: Ch 12, SL to 1st CH, CH 1, Turn.
Rnd 1: 30 SC in CH 12 sp, Ch 1, turn.
Rnd 2: SC around, Ch 20, Sl in 18th CH from hook. Tie off.
Take all four separate pieces and stiffen with Fabric stiffener and let dry. Take two wings and arrange them touching together at the base and glue the base/bottom of the head on the top part of wings as seen in picture. Then place Christmas Dress on top of the base of wings and glue down. Now you are finished!
==========================================================================
Christmas Angel Ornament
Designed by Crafts by StarlightAll Rights Reserved
Fill your Tree with hand-made Ornaments! This Christmas Angel is a simple and easy ornament to make. Great for Gifts especially sending them through the mail for family that are a distance from you.
Materials: Autn Lydia's Classic Crochet thread -Size 10; Red, Green, and white Thread. Hook Size 1.8 mm, and Fabric Stiffener.
Ch = Chain SL = Slip Crochet
SC = Single Crochet HDC= Half Double Crochet
DC = Double Crochet
TR = Treble Crochet
R = Red Thread
G= Green Thread
W= White Thread
Dress
R-Base: Ch 9.
Row 1: 8 SC, Ch 1, Turn.
Row 2: *SC, Ch 3, Rep across from, Ch 1, Turn.
G-Row 3: SC across in sc sps, CH 1, Turn.
Row 4-5: 8 SC, Ch 1, turn.
Row 6: 1 SC, Dec 1, 4 SC, Dec 1, 1 SC, Ch 1, Turn.
Row 7: 6 SC, Ch 1, Turn.
R-Row 8: *1 SC, Ch 3, Rep across from *, end with SC, Ch 1, Turn.
Row 9: SC across in SC sps, CH 1, turn.
G-Row 10: 6 SC across, CH 1, Turn.
Row 11: * 1 SC, CH 3, Rep across from *, CH 1, Turn.
Row 12: * 6 SC in CH 3 sp, SL in next SC sp, Rep across from * SC in last sp, CH 1, Turn.
Row 13: CH 6, SC in 7th SC (not CH) from hook, *CH 5, SK 5 sps, 1 SC in next SC, Rep 2 times from*, CH 6, SK 6 SC sps, 1 SC, Ch 1, Turn.
Row 14: 4 SC in CH 6 sp, * Ch 3, 1 SC in next CH SP, Rep 2 times from *, Ch 3, 4 SC in next sp, CH 1, Turn.
Row 15: SC in 2nd sc from hook, SC, *6 SC in CH 6 sp, SL in SC, Rep 2 times from *, 6 SC in CH 3 sp, 1 SC, SL, CH 1, turn.
Row 16: SC in 2nd SC from hook, CH 3, SK 2 sps, 1 SC, * CH 5, Sk 5 sps, 1 SC, Rep 2 times from *, CH 3, SK 4 sp, SL in last SC, CH 1, Turn.
Row 17: In CH 3 SP (1 SC, CH 3 and rep 5 times), * In CH 5 sp (1 SC, CH 3, Rep 7 times) repeat from * 2 times, In Ch 3 sp (1 SC, Ch 3, Rep 5 times) tie off.
Wings
W - Base: Ch 7, Sl to 1st CH made, Ch 1, turn.
Rnd 1: In CH sp (5 SC, 3 HDC, 1 DC, CH 3, 1 DC, 3 HDC, 5 SC,) SL to 1st SC made, Ch 1, Turn.
Rnd 2: 6 SC, 4 HDC, in CH 3 sp (3 DC, 1 TR, CH 3, 1 TR, 3 DC), 4 HDC, 6 SC, Sl to 1st sc made, CH 1, Turn.
Rnd 3: 13 SC, in CH 3 sp (5 SC, CH 2, 5 SC), 13 SC, SL to 1st sc made. Tie off
Repeat Wing 1 more time.
Head
White- Base: Ch 12, SL to 1st CH, CH 1, Turn.
Rnd 1: 30 SC in CH 12 sp, Ch 1, turn.
Rnd 2: SC around, Ch 20, Sl in 18th CH from hook. Tie off.
Take all four separate pieces and stiffen with Fabric stiffener and let dry. Take two wings and arrange them touching together at the base and glue the base/bottom of the head on the top part of wings as seen in picture. Then place Christmas Dress on top of the base of wings and glue down. Now you are finished!
Related articles
- Handmade Christmas Gifts # 2 1/2 - More Crochet Ideas (odetomyabode.com)
- Crochet Pattern: Tiny Pear Necklace Charm (speckless.wordpress.com)
- Crochet Hibiscus Flowers (speckless.wordpress.com)
- Crochet bathroom rug (momphotographer.wordpress.com)
- The Joy of Foundation Crochet (gateauxetbisous.wordpress.com)
- Holiday crafts!!! (renakaylor.wordpress.com)
- Wooden Christmas Ornaments (homemadetreasuresbyvalerie.wordpress.com)
- Musical Ornaments (jennjilldesigns.wordpress.com)
- Victorian Christmas (busybusyhoneybee.wordpress.com)
Saturday, October 22, 2011
Finally got to paint!
Well, I have been following Sharon Tomlinson at Norah's and I have been intrigued by the process she is using to paint over magazine pictures to get a completely different picture. I have a huge stack of cardboard from work. These are 81/2x11 because they are the cardboard at the bottom of the packs of forms we use at work. Usually we just throw them out, but I started saving them and in a month had more than I will ever use.
Anyway, I pasted pictures on the cardboard and then painted over it. I have to say it is not as easy as she makes it look. I will need to practice and practice some more to ever be satisfied with this artform, but it was pretty fun and I had no expectations, so I could just have fun! At least I finally got back to the paint table. I think tomorrow I will try another. But in the meantime, here's what I did:
Can you tell that I started with a close-up of a man's face? I can, but I just wonder if anyone else can. She is certainly no beauty, but I am pleased with her. I really enjoyed the collage of her hair.
Let me know what you think about her, won't you?
Friday, October 14, 2011
Pearl Rosette Bib Necklace By: Helen Slabodukh for Blumenthal Lansing
Here is a tutorial that just blew me away. I found it on FaveCrafts and just knew I had to repost it here for you to try. This would make everyone stand and take notice agains a boat-necked black dress!
I think I may have to make this to give at Christmas to one of my special friends who loves to dress up and dress fancy. She will absolutely love this and look divine in it!
----------------------------------------------------------------------------------------------------------------
I think I may have to make this to give at Christmas to one of my special friends who loves to dress up and dress fancy. She will absolutely love this and look divine in it!
----------------------------------------------------------------------------------------------------------------
How do you make fabric rosettes? Find out with this tutorial, then arrange them into a chic pearl rosette bib necklace, perfect for a special occasion like your wedding day. This feminine necklace is so simple to make!
Materials:
Materials:
- Glamour Gems Buttons: #5210 (2 cards)
- La Mode® Buttons: #4612 (5 cards)
- ½” yard soft white fabric
- Kunin felt square: white
- White tulle
- Premade chain with pearls
- Toggle clasp
- 2 7mm jump rings
- Scissors
- Ruler
- 2 pairs chain nose pliers
- Wire cutters
- Hot glue gun and glue
- Pencil
- Tie an overhand knot in the center of a strip of fabric. Hold the fabric at the knot with two tails together. Twist a short section of the two tails. Wrap it around the knot, which will be the center point of the rosette. Tack in place with glue. Continue wrapping and tacking until rosette is the size you want. Repeat for four more rosettes.
- Lay the rosettes on the felt. Loosely trace with pencil. Cut felt a bit smaller than the traced line. Cut out.
- Glue rosettes to felt. Folding pieces of tulle in half, glue them under and around rosettes. Glue buttons as rosette centers and accents.
- Cut two lengths of chain to make the necklace the needed length. Glue the end of one chain on the back of the necklace piece at the top left. Repeat with other chain at top, back right.
- Use jump rings to attach toggle pieces to loose ends of chain.
- Refer to photo for placement and assembly.
- Cut tulle into 2” x 6” pieces.
- Cut or tear white fabric into 2” strips. The length of the fabric will determine the diameter of the rosette. Make them any size you desire.
- When tacking rosette with glue, use a tiny amount, trying not to let it show on the surface of the rosette.
- when gluing chain to necklace, use a lot of glue. Let it dry before continuing.
- Using a jump ring: grab ends of jump ring at either side of cut with pliers. Twist ring open. String through loop of toggle clasp. Twist tightly closed.
Related articles
- Rosette Envy (emilyjsimpson.wordpress.com)
- Definition: Rosette (fabsugar.com)
- Be a Romantic Bride (socyberty.com)
- Christmas day gift helix pendant wish pearl necklace (jcgift-fundraisingblog.com)
Wednesday, October 12, 2011
Making a Christmas Door Wreath
Here's a couple of videos about making Christmas wreaths. It is getting to be that time of year, so we better get started making our decorations if we want to be ready!
Subscribe to:
Posts (Atom)
Why Are Orcas Attacking Boats?
Recently I have been reading articles and news about Orcas attacking boats and causing quite a bit of anxiety. Since these whales hunt in p...
-
Today my baby left to go home to Oklahoma. I am already missing her. We had a lovely time and I thoroughly enjoyed every second spent with...
-
Several days ago, I posted about a class on faces from Norah'S Art blog . Well, she finally got it set up and enrollment is now open. ...
-
Well, this blogging stuff is harder than I realized. I thought that since I spend considerable time daily online, this would be easy, but I...