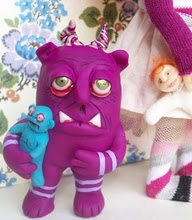
This is a copy of part of a blog entry from Amarettogirl. I just discovered her blog this morning and I am blown away. Her header is fantastic, but this entry is really exceptional. I have only posted a small part of the entry and you will have to go to her site and read the rest. The finished doll is showcased there also, so if this is interesting to you, you will need to click over to see the results. Believe me it is well worth the trouble of clicking. I will be anxiously awaiting more entries in her blog and I believe you will also.
-------------------------------------------------------------------------------------------------------------
This is just an excerpt from the blog:
My mind was set from the beginning that my doll would be a sad, sullen girl - this I knew.
So check out my early stages and as my students told me all along the way the images can be freaky...
So having made dolls before and truly enjoying the spirit of allowing a narrative to develop between me, the process and the matter (which in this case of art-making is the doll), I allowed much to be developed intuitively as I went. I also based much of my artistic design choices on where my heart was at that moment...[read more]
Where I frequently fall down various "Rabbit Holes" by reading the news online. Sometimes this leads to my ranting and sometimes it leads to very interesting posts.
Showing posts with label Doll Making. Show all posts
Tuesday, December 6, 2011
Wednesday, September 7, 2011
Niblet & Biscuit Doll Tutorial
Here is a wonderful tutorial I found on Gwenny Penny that I know you will want to try. This site is full of tutorials and beautiful photographs and I encourage you to visit there, especially if you like this tutorial.
These are the cutest little dolls. I can see me making several of these in the near future for presents. Don't you know someone who would simply love to have one?
_________________________________________________________________________________
Let's get to it...
Materials you will need to make one 7 inch doll (either Niblet or Biscuit):
Click here to download, save, or print the templates for the dolls.
Part I: Sewing the Head, Ears, Arms, and Legs
Step 1: Print and cut out all templates.
Step 2: Trace templates onto flannel and cut out. You should have 2 head pieces (template A), 8 arm/leg pieces (template B), and 4 ear pieces (template C or E). Trace template D or templates F and G onto felt and cut out. You should have 2 inner ear pieces (template D or F). If you are making Biscuit you should also have one muzzle piece (template G).
Step 4: Take one flannel ear piece and center one felt inner ear piece on top, lining up the bottom edges of both pieces. Hand sew the felt to the flannel using 3 strands of embroidery floss that match your felt. Repeat for the second ear.
Step 6: Now it's time to create the face. Use the face templates provided for placement of eyes, nose, and mouth. For eyes, use a ¼" hole punch to punch two circles out of black felt. My punch didn't go all the way through the felt, so I finished the cut with scissors. Hand sew black felt eyes onto one flannel head piece using 3 strands of black embroidery floss.
Part III: Finishing the Doll
Step 13: Tightly whipstitch the very base of the head to the very top of the body. Double up your thread when you do this to make sure it's secure. Trust me, we've already had a casualty in our house.
These are the cutest little dolls. I can see me making several of these in the near future for presents. Don't you know someone who would simply love to have one?
_________________________________________________________________________________
Let's get to it...
Materials you will need to make one 7 inch doll (either Niblet or Biscuit):
- Flannel for head, ears, arms, and legs – ¼ yd
- Cotton for body – fat quarter or large scraps
- Felt – small scraps (black for eyes, pink for Niblet's inner ears, tan for Biscuit's inner ears and muzzle)
- Embroidery floss (black, pink, tan)
- Polyfill
- Coordinating thread
- ¼" hole punch
- Optional: ribbon, buttons, fabric scraps, round cord elastic, and ¼" elastic for dressing up
Click here to download, save, or print the templates for the dolls.
Part I: Sewing the Head, Ears, Arms, and Legs
Step 1: Print and cut out all templates.
Step 2: Trace templates onto flannel and cut out. You should have 2 head pieces (template A), 8 arm/leg pieces (template B), and 4 ear pieces (template C or E). Trace template D or templates F and G onto felt and cut out. You should have 2 inner ear pieces (template D or F). If you are making Biscuit you should also have one muzzle piece (template G).
Step 3: Place two arm/leg pieces of flannel together. Sew around ¼" from the outside edge. Repeat for the other three arms/legs. Turn all four arms/legs right side out.
Step 5: Match up one blank flannel ear piece with one felt/flannel ear piece. Line them up with right sides together (felt should be in between the two pieces). Sew around ¼" from the outside edge. Repeat for the other ear. Clip your corners. Turn both ears right side out.
- For Niblet, embroider the nose using 3 strands of pink embroidery floss and the mouth using 3 strands of black embroidery floss.
- For Biscuit, place the felt muzzle on the flannel face. Attach using 3 strands of black embroidery floss to make three French knots on either side of the muzzle. Embroider the nose and mouth using 3 strands of black embroidery floss.
Step 8: Turn your head right side out. Stuff the head with polyfill. Tuck the raw edges of the gap inside the head. Sew the gap closed. You now have a complete head!
Part III: Finishing the Doll
Step 13: Tightly whipstitch the very base of the head to the very top of the body. Double up your thread when you do this to make sure it's secure. Trust me, we've already had a casualty in our house.
Wednesday, October 6, 2010
Window Shopping Wednesday -- Marina Bychkova
This wonderful doll artist was one of the first to catch my eye. These are called ball-jointed dolls and hers are made of porcelain. Although her dolls are exquisite in the nude, her choice of clothing and decoration leaves me breathless. I hope you like these as much as I do.
Wednesday, June 30, 2010
Wordless Wednesday -- Gritty Jane
If you do any surfing for art dolls or any type of painting, you will no doubt come across Gritty Jane. She has online doll making classes and is a very talented painter. She has videos on YouTube where you get to watch her at work. I love the texture and the subject matter in her painting, but I really love her art dolls. I hope you do too. Check out her site at grittyjane or at Gritty Jane.
Here is just a peek at some of her work:
Wednesday, June 23, 2010
Wordless Wednesday -- Mealy Monster Land
This is one of the first art doll sites I started following regularly. Her monsters are so dang cute and her blog is just too entertaining. I hope you will visit her and say "Hi". Tell her I sent you. Once you see her work, you, too, will become an avid follower I am sure! Visit her at mealy monster land.
Here are just a few of her monsters:
Thursday, November 12, 2009
In the Spotlight: Black-Eyed Suzie
Here is another of my favorite art doll makers for your enjoyment. I stumbled onto here sight quite by accident and then couldn't find it again for almost a month. I just couldn't remember her name to be able to Goggle it. Then, quite by accident again, I found the above you tube video. I really love her work. It reminds me of The night before Christmas and Tim Burton, but she describes her work as influenced by the gothic love stories she read in her youth.
No matter the source, I hope you like these dolls as much as I do and encourage you to visit her site often. She is quite prolific and turns out so many beautiful dolls.
Here are some more pictures of her work.
Subscribe to:
Posts (Atom)
Why Are Orcas Attacking Boats?
Recently I have been reading articles and news about Orcas attacking boats and causing quite a bit of anxiety. Since these whales hunt in p...
-
Today my baby left to go home to Oklahoma. I am already missing her. We had a lovely time and I thoroughly enjoyed every second spent with...
-
Several days ago, I posted about a class on faces from Norah'S Art blog . Well, she finally got it set up and enrollment is now open. ...
-
Well, this blogging stuff is harder than I realized. I thought that since I spend considerable time daily online, this would be easy, but I...