Please visit The Polka Dot Pixie blog, too, because there are really great posts to be found there!
Happy Crafting! Happy Easter!
__________________________________________________________________________________
 In case anyone wanted to sculpt their own little party chick ... here is the way I made him. To begin, you will need paper clay, sculpting tools, water, a small flat paintbrush and a Styrofoam egg and ball, paper tape and 20 gauge floral wire.
 Begin by twisting and shaping wire into bird feet and legs. Cover with paper tape.
Soak Styrofoam egg in water and then cover with paper clay, smoothing and shaping with your hands and paintbrush. Insert legs into bottom of egg, and pose in any fashion you choose.
 Indent Styrofoam ball with smooth barreled paint brush handle or a smooth barreled pencil. Shape Styrofoam to create a head shape.
 Soak Styrofoam head in water and cover with paper clay forming a smooth surface with hands and brush.
To create the face, form two small balls and 2 small cone shapes. Flatten balls in to "puffy pancakes" and attach to head, one on each side, to create cheeks.

Attach cone shapes to create beak. Smooth face with paintbrush and water. Shape beak with sculpting tools and paintbrush to create a smile.

Using paper clay, create a small barrel shaped neck to attach head to body. Smooth with paintbrush and water.
 Adding a wire here also adds extra strength to your piece. You can tilt the head to the side to add some personality.
Shape wings and attach to chick body with paintbrush and water.


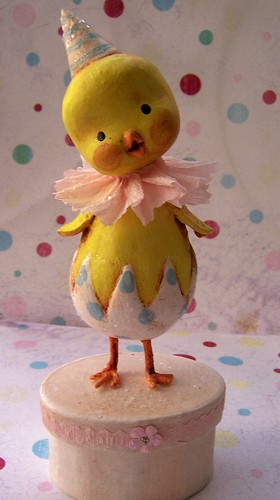
I didn't take pics of the painting process, but I recommend that you let the chick dry for a least week before painting. I always gesso paper clay before painting with good quality acrylic paints, and finish the pieces up with a matte acrylic sealer, which is then antiqued with watered down burnt umber paint. After I attached this chick to a hand painted paper mache box, I added just a touch of glass glitter here and there to give him a little sparkle.
I hope you have fun with your creations! If you decide to make one I'd love to see the finished pics!
Here is a link to the original post
![Reblog this post [with Zemanta]](https://lh3.googleusercontent.com/blogger_img_proxy/AEn0k_uyB_WQI5cxCcVqLl3-rWmyi_nPLvgg_BzyzW7Nium_WXNvc98rizs2QIbVj9_Mh1jJzn6IASYYepTQBwwiAtSb8TPC_uPLdfULQlngIg4qtE9-vbPtjuoIT19oIUQGtkqy_urKF6UUqW0cM6nu-ntc=s0-d)


![Reblog this post [with Zemanta]](https://lh3.googleusercontent.com/blogger_img_proxy/AEn0k_upx0ZaeT0weKijaNSBeWDKHpfcSXk67fsODOY00XBXfj9sGFpypHb3YgilXwjjmQ2ZFwMQILqZiTOTnC--G68H8gXTXnxUmguFrmRMLy8JslMQ9AQSRZE-FszGdOJOywS4lsbbKdj5OxQA5HbPmkpa=s0-d)


![Reblog this post [with Zemanta]](https://lh3.googleusercontent.com/blogger_img_proxy/AEn0k_vUlYFgBeEWKUwxMVc7cyCqnXjYWS8aFvxhZ78Tv0Zyl-vx0bOPGzz1i8wEzgmiZa_Fu6AxbL8s6_4cxk2YNJSrEjc16IRVMkT2ADNT6fO7lIbmztioqkWUEQENCCDNbuB6cfcWWZaM17RzBGx9TYg=s0-d)


![Reblog this post [with Zemanta]](https://lh3.googleusercontent.com/blogger_img_proxy/AEn0k_vUsdcRvK7W_JgkgxylXj6TAn-hhRXXoPy6wkukHqh9JH4ztFOC11Cd5TBcBve_RKFclCPnws1HYEruT-UuoPL0hB-gY34W339Qh0Aq22XKYABSrge2_AaHgmL9UddyvQqw_l4S1eiKoevjn4Sqd20=s0-d)

![Reblog this post [with Zemanta]](https://lh3.googleusercontent.com/blogger_img_proxy/AEn0k_vrYcOS_XR11CDYuisA1vP5MU_3Wx7H9geSpZhn_C9_V4n0OWZym1utrPsQtLP-s-6V7xjPiBP709xX_mPjFs3gQkjkwqQPCfgdbyOqpij8fQ6txW79_hh-9OnCJJgRTGdN6-wRw20jMfVRxRxRxsZh=s0-d)


![Reblog this post [with Zemanta]](https://lh3.googleusercontent.com/blogger_img_proxy/AEn0k_urB2RW6SmZBnBQS-wi70Ymhn8XTlP1njlv24zgHzlsfF2VH7NQNz3wdf1Hxxz52ctQJLZz0r61nZRLG0vERyLj1tSbRYts3oUdDPtapZidO_12BZXz_VvvC4U2KquXpSFbVmKHYPaymhORwH-SB062=s0-d)


![Reblog this post [with Zemanta]](https://lh3.googleusercontent.com/blogger_img_proxy/AEn0k_uifZHISDJyjSEBluM6ep-rEqVGRhdyblj1SDQumYVrWxEEeYeZmg8bwXltlqCMG08eSLybIQ81mksdjB9IFg20Fs6i8jGwy-KjGlnLwVjJVVz5CYhDHtohzNUdTM4hHEHcnL_oX06l0qytyll0X_Bj=s0-d)


