
Saturday, December 24, 2011
Saturday, December 17, 2011
Finally started drawing again!
I'm working my way through the book, The Artist's Way, and I feel that because of doing those morning pages, I have finally gotten to start drawing again. Nothing spectacular or wonderful. As a matter of fact, to complete the first one I had to use a grid system to get the spacing and sizing correct. Here it is:
 Then the next week I tried to draw without the grid and did not do so good, but I still like the picture. I am planning to work some more and tweak parts of this picture and will show you again when I feel it is finished. I liked this picture because the girl in it has the largest eyes I have ever seen on a person.
 I think her nose is too long and her jaw is too weak, so will be working on those issues. Otherwise, I really think it looks like the girl in the picture I used to draw from.
More to come later!


More to come later!
Saturday, December 10, 2011
TUTORIAL ~ Make your own Ballet Slippers
Here is a wonderful tutorial for those of you who are looking for that perfect handmade gift to give to the girl who has everything. This tutorial is so well put together that even if you don't sew, you can probably still figure out how to make a pair of these cute slippers.
I found this tutorial and many other wonderful items at Shabby Raggy Roses and I recommend that you check it out. I absolutely love this slipper tutorial and hopefully will try to make me a pair after Christmas is over and life is back to normal.
If you do make these, please let her know how they turned out by emailing her at:
charjen1@optusnet.com.au ---------------------------------------------------------------------------------------------------------------

I'm using a cute print form Moda's Wonderland Bloom! Along with Moda Essential Dots for the inside fabric.

Once you have all your peices cut, assemble them as shown below -


I found this tutorial and many other wonderful items at Shabby Raggy Roses and I recommend that you check it out. I absolutely love this slipper tutorial and hopefully will try to make me a pair after Christmas is over and life is back to normal.
If you do make these, please let her know how they turned out by emailing her at:
charjen1@optusnet.com.au ---------------------------------------------------------------------------------------------------------------

Ballet Slippers
Here's an easy way to make some really cute slippers! Hopefully my instructions will be easy to understand! There are other ways to make these, but this is probably the easiest way. Make any changes where you prefer.
I'm a size 7.5 ( My foot measures 24.5cms) so the pattern is to fit me - please adjust to fit.
First of all, download 'Slipper base' template & 'Slipper top' template. Print, this will be your template to cut your fabic. If your foot is larger, I would say adding the extra length of your measured foot to the tails of the slipper top and to the sole would make for a perfect fit.
I'm using a cute print form Moda's Wonderland Bloom! Along with Moda Essential Dots for the inside fabric.
You will need to cut:
Base ~ 4 from wadding, 2 from interfacing, 2 inside peices and 2 bottom peices - You may want to find some non slip fabric for this, or something a little more durable.
*Make sure you flip your template so you have a left & right foot peice!
Slipper top ~ 2 from you feature fabric, 2 from wadding, 2 from the medium interfacing & 2 from your inside fabric to match the base.
Once you have all your peices cut, assemble them as shown below -
Base: Bottom peice, Interfacing, 2x wadding peices (for extra padding) and then your inside peice.
Slipper top needs to assembled - wadding peice, Inside peice (facing up) and the feature peice (facing down) so fabric is right sides together, then interfacing on top.
Once you have pinned them, stitch around each base holding all 5 layers together
Then sew around the inner curve of your top peice
Unpin the top peices, and you will need to pull the top fabric around to the other side ~ wiggle and press till nice and flat.
Topstitch around the inner curve...
Pin the tails of the top peice with feature fabric (top fabric) right sides together, sew along the edge securely - here I've added a binding to hide the edge or you can leave it raw.
Pin the top section to your base with your feature fabric and outside of bottom peice to the inside.
Carefully sew around the outside edge ensuring you're sewing through all layers really well, overlock or zig zag around the edge too.
Turn inside out - and you have a lovely pair of Ballet Slippers
Now embellish! These ones got a little bow on each side.
These got some cute crochet lace...
Again some crochet lace with some little buttons!
And finally some pink Ric Rac! Yo-yo's would be a great idea too!
Well I hope that was easy enough to understand - a bit confusing when I read back through it afterwards, but I tried.
I'd love to hear your feedback, and see pic's of finished slippers! Please feel free to email me at charjen1@optusnet.com.au if you need any further info.
Tuesday, December 6, 2011
I just discovered another doll artist to showcase
This is a copy of part of a blog entry from Amarettogirl. I just discovered her blog this morning and I am blown away. Her header is fantastic, but this entry is really exceptional. I have only posted a small part of the entry and you will have to go to her site and read the rest. The finished doll is showcased there also, so if this is interesting to you, you will need to click over to see the results. Believe me it is well worth the trouble of clicking. I will be anxiously awaiting more entries in her blog and I believe you will also.
-------------------------------------------------------------------------------------------------------------
This is just an excerpt from the blog:
My mind was set from the beginning that my doll would be a sad, sullen girl - this I knew.
So check out my early stages and as my students told me all along the way the images can be freaky...
 Stage one photo and doll by m.diaz
 Stage two of my doll
Stage three - Beginning the Painting photo and doll by M.Diaz
So having made dolls before and truly enjoying the spirit of allowing a narrative to develop between me, the process and the matter (which in this case of art-making is the doll), I allowed much to be developed intuitively as I went. I also based much of my artistic design choices on where my heart was at that moment...[read more]

-------------------------------------------------------------------------------------------------------------
This is just an excerpt from the blog:
My mind was set from the beginning that my doll would be a sad, sullen girl - this I knew.
So check out my early stages and as my students told me all along the way the images can be freaky...
Stage one photo and doll by m.diazStage two of my doll Stage three - Beginning the Painting photo and doll by M.Diaz
So having made dolls before and truly enjoying the spirit of allowing a narrative to develop between me, the process and the matter (which in this case of art-making is the doll), I allowed much to be developed intuitively as I went. I also based much of my artistic design choices on where my heart was at that moment...[read more]
Saturday, December 3, 2011
More on my handmade Christmas ornaments!
I finished making 12 of the lovely crepe paper ornaments. I used three colors, red, green and white. I really like the way they turned out, but I tried to add glitter to the red ornaments and I don't much care for it. I think I will have to remake four new red ones and just leave them plain.
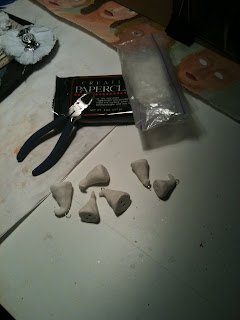
I started making new Santas from paperclay. The ones I made a couple of years ago are flat. These will be more dimensional. I just started them the other day and am anxiously awaiting their drying. Once they are totally dry, I will begin to paint them and add the ribbon legs with beads for his boots. I can't wait to see them finished.
I loved the first batch of flat Santas, I will love this batch of 3-D Santas, too.
I'll post pictures as I work on them so you can see what I am doing. So far, the only thing you need to make these is paperclay, paper clips, a wire cutting tool, a tool for making holes in the bottom to attach the legs, and some paint. I intend to use dimensional paint to make the beard and mustache, as well as to decorate Santa's hat. You will also need som thin ribbon for his legs.
Here he is so far:


Thursday, November 24, 2011
Working on Christmas Tree Ornaments this year!
I am diligently working on making new Christmas Tree ornaments this year. I hate putting up a tree, but I have managed to convince myself that it is okay if all the ornaments on the tree are handmade. One year I made snowflakes from toilet paper tubes and glitter (they are so beautiful!!!!), the next year I made Santa ornaments out of paperclay and ribbon. They were time intensive but worth the effort. I love hanging these on my tree. This year I am making crepe paper ornaments to hang. I am having fun and they are getting done. I hope to be finished soon, but will go ahead and put up the tree without them for now. I also have an idea for a garland that will be so beautiful. May not get that one done this year, but I could start now for next year's tree.
Here are some pics of my work in progress:


 I still have to put the glitter on them, but I want to do that after all are made because it will be sooooooo messy. I'll have to go out to the garage to do that part. They are pretty cute, huh?

Here are some pics of my work in progress:


Happy Thanksgiving to you all!
Friday, October 28, 2011
Christmas Craft Ideas - Christmas Angel Ornament
Christmas is less than 2 months away. It's past time to be doing your shopping, and decoration making. I found this lovely angel pattern to crochet and felt it would be quick enough to make that I would put it up here for those last minute crafters. These little angels would really be cute included in your Christmas cards you mail to friends and family far away. They could be hung on the tree to remind the recipients of you. I found this pattern on Craft Town and I invite you to visit this site for more wonderful ideas for crafts.
==========================================================================

Fill your Tree with hand-made Ornaments! This Christmas Angel is a simple and easy ornament to make. Great for Gifts especially sending them through the mail for family that are a distance from you.
Materials: Autn Lydia's Classic Crochet thread -Size 10; Red, Green, and white Thread. Hook Size 1.8 mm, and Fabric Stiffener.
Ch = Chain SL = Slip Crochet
SC = Single Crochet HDC= Half Double Crochet
DC = Double Crochet
TR = Treble Crochet
R = Red Thread
G= Green Thread
W= White Thread
Dress
R-Base: Ch 9.
Row 1: 8 SC, Ch 1, Turn.
Row 2: *SC, Ch 3, Rep across from, Ch 1, Turn.
G-Row 3: SC across in sc sps, CH 1, Turn.
Row 4-5: 8 SC, Ch 1, turn.
Row 6: 1 SC, Dec 1, 4 SC, Dec 1, 1 SC, Ch 1, Turn.
Row 7: 6 SC, Ch 1, Turn.
R-Row 8: *1 SC, Ch 3, Rep across from *, end with SC, Ch 1, Turn.
Row 9: SC across in SC sps, CH 1, turn.
G-Row 10: 6 SC across, CH 1, Turn.
Row 11: * 1 SC, CH 3, Rep across from *, CH 1, Turn.
Row 12: * 6 SC in CH 3 sp, SL in next SC sp, Rep across from * SC in last sp, CH 1, Turn.
Row 13: CH 6, SC in 7th SC (not CH) from hook, *CH 5, SK 5 sps, 1 SC in next SC, Rep 2 times from*, CH 6, SK 6 SC sps, 1 SC, Ch 1, Turn.
Row 14: 4 SC in CH 6 sp, * Ch 3, 1 SC in next CH SP, Rep 2 times from *, Ch 3, 4 SC in next sp, CH 1, Turn.
Row 15: SC in 2nd sc from hook, SC, *6 SC in CH 6 sp, SL in SC, Rep 2 times from *, 6 SC in CH 3 sp, 1 SC, SL, CH 1, turn.
Row 16: SC in 2nd SC from hook, CH 3, SK 2 sps, 1 SC, * CH 5, Sk 5 sps, 1 SC, Rep 2 times from *, CH 3, SK 4 sp, SL in last SC, CH 1, Turn.
Row 17: In CH 3 SP (1 SC, CH 3 and rep 5 times), * In CH 5 sp (1 SC, CH 3, Rep 7 times) repeat from * 2 times, In Ch 3 sp (1 SC, Ch 3, Rep 5 times) tie off.
Wings
W - Base: Ch 7, Sl to 1st CH made, Ch 1, turn.
Rnd 1: In CH sp (5 SC, 3 HDC, 1 DC, CH 3, 1 DC, 3 HDC, 5 SC,) SL to 1st SC made, Ch 1, Turn.
Rnd 2: 6 SC, 4 HDC, in CH 3 sp (3 DC, 1 TR, CH 3, 1 TR, 3 DC), 4 HDC, 6 SC, Sl to 1st sc made, CH 1, Turn.
Rnd 3: 13 SC, in CH 3 sp (5 SC, CH 2, 5 SC), 13 SC, SL to 1st sc made. Tie off
Repeat Wing 1 more time.
Head
White- Base: Ch 12, SL to 1st CH, CH 1, Turn.
Rnd 1: 30 SC in CH 12 sp, Ch 1, turn.
Rnd 2: SC around, Ch 20, Sl in 18th CH from hook. Tie off.
Take all four separate pieces and stiffen with Fabric stiffener and let dry. Take two wings and arrange them touching together at the base and glue the base/bottom of the head on the top part of wings as seen in picture. Then place Christmas Dress on top of the base of wings and glue down. Now you are finished!

==========================================================================
Christmas Angel Ornament

Fill your Tree with hand-made Ornaments! This Christmas Angel is a simple and easy ornament to make. Great for Gifts especially sending them through the mail for family that are a distance from you.
Materials: Autn Lydia's Classic Crochet thread -Size 10; Red, Green, and white Thread. Hook Size 1.8 mm, and Fabric Stiffener.
Ch = Chain SL = Slip Crochet
SC = Single Crochet HDC= Half Double Crochet
DC = Double Crochet
TR = Treble Crochet
R = Red Thread
G= Green Thread
W= White Thread
Dress
R-Base: Ch 9.
Row 1: 8 SC, Ch 1, Turn.
Row 2: *SC, Ch 3, Rep across from, Ch 1, Turn.
G-Row 3: SC across in sc sps, CH 1, Turn.
Row 4-5: 8 SC, Ch 1, turn.
Row 6: 1 SC, Dec 1, 4 SC, Dec 1, 1 SC, Ch 1, Turn.
Row 7: 6 SC, Ch 1, Turn.
R-Row 8: *1 SC, Ch 3, Rep across from *, end with SC, Ch 1, Turn.
Row 9: SC across in SC sps, CH 1, turn.
G-Row 10: 6 SC across, CH 1, Turn.
Row 11: * 1 SC, CH 3, Rep across from *, CH 1, Turn.
Row 12: * 6 SC in CH 3 sp, SL in next SC sp, Rep across from * SC in last sp, CH 1, Turn.
Row 13: CH 6, SC in 7th SC (not CH) from hook, *CH 5, SK 5 sps, 1 SC in next SC, Rep 2 times from*, CH 6, SK 6 SC sps, 1 SC, Ch 1, Turn.
Row 14: 4 SC in CH 6 sp, * Ch 3, 1 SC in next CH SP, Rep 2 times from *, Ch 3, 4 SC in next sp, CH 1, Turn.
Row 15: SC in 2nd sc from hook, SC, *6 SC in CH 6 sp, SL in SC, Rep 2 times from *, 6 SC in CH 3 sp, 1 SC, SL, CH 1, turn.
Row 16: SC in 2nd SC from hook, CH 3, SK 2 sps, 1 SC, * CH 5, Sk 5 sps, 1 SC, Rep 2 times from *, CH 3, SK 4 sp, SL in last SC, CH 1, Turn.
Row 17: In CH 3 SP (1 SC, CH 3 and rep 5 times), * In CH 5 sp (1 SC, CH 3, Rep 7 times) repeat from * 2 times, In Ch 3 sp (1 SC, Ch 3, Rep 5 times) tie off.
Wings
W - Base: Ch 7, Sl to 1st CH made, Ch 1, turn.
Rnd 1: In CH sp (5 SC, 3 HDC, 1 DC, CH 3, 1 DC, 3 HDC, 5 SC,) SL to 1st SC made, Ch 1, Turn.
Rnd 2: 6 SC, 4 HDC, in CH 3 sp (3 DC, 1 TR, CH 3, 1 TR, 3 DC), 4 HDC, 6 SC, Sl to 1st sc made, CH 1, Turn.
Rnd 3: 13 SC, in CH 3 sp (5 SC, CH 2, 5 SC), 13 SC, SL to 1st sc made. Tie off
Repeat Wing 1 more time.
Head
White- Base: Ch 12, SL to 1st CH, CH 1, Turn.
Rnd 1: 30 SC in CH 12 sp, Ch 1, turn.
Rnd 2: SC around, Ch 20, Sl in 18th CH from hook. Tie off.
Take all four separate pieces and stiffen with Fabric stiffener and let dry. Take two wings and arrange them touching together at the base and glue the base/bottom of the head on the top part of wings as seen in picture. Then place Christmas Dress on top of the base of wings and glue down. Now you are finished!
Saturday, October 22, 2011
Finally got to paint!
Well, I have been following Sharon Tomlinson at Norah's and I have been intrigued by the process she is using to paint over magazine pictures to get a completely different picture. I have a huge stack of cardboard from work. These are 81/2x11 because they are the cardboard at the bottom of the packs of forms we use at work. Usually we just throw them out, but I started saving them and in a month had more than I will ever use.
Anyway, I pasted pictures on the cardboard and then painted over it. I have to say it is not as easy as she makes it look. I will need to practice and practice some more to ever be satisfied with this artform, but it was pretty fun and I had no expectations, so I could just have fun! At least I finally got back to the paint table. I think tomorrow I will try another. But in the meantime, here's what I did:

 Can you tell that I started with a close-up of a man's face? I can, but I just wonder if anyone else can. She is certainly no beauty, but I am pleased with her. I really enjoyed the collage of her hair.
Let me know what you think about her, won't you?

Anyway, I pasted pictures on the cardboard and then painted over it. I have to say it is not as easy as she makes it look. I will need to practice and practice some more to ever be satisfied with this artform, but it was pretty fun and I had no expectations, so I could just have fun! At least I finally got back to the paint table. I think tomorrow I will try another. But in the meantime, here's what I did:


Let me know what you think about her, won't you?
Friday, October 14, 2011
Pearl Rosette Bib Necklace By: Helen Slabodukh for Blumenthal Lansing
Here is a tutorial that just blew me away. I found it on FaveCrafts and just knew I had to repost it here for you to try. This would make everyone stand and take notice agains a boat-necked black dress!
I think I may have to make this to give at Christmas to one of my special friends who loves to dress up and dress fancy. She will absolutely love this and look divine in it!
----------------------------------------------------------------------------------------------------------------
 How do you make fabric rosettes? Find out with this tutorial, then arrange them into a chic pearl rosette bib necklace, perfect for a special occasion like your wedding day. This feminine necklace is so simple to make!
Materials:

I think I may have to make this to give at Christmas to one of my special friends who loves to dress up and dress fancy. She will absolutely love this and look divine in it!
----------------------------------------------------------------------------------------------------------------
Materials:
- Glamour Gems Buttons: #5210 (2 cards)
- La Mode® Buttons: #4612 (5 cards)
- ½” yard soft white fabric
- Kunin felt square: white
- White tulle
- Premade chain with pearls
- Toggle clasp
- 2 7mm jump rings
- Scissors
- Ruler
- 2 pairs chain nose pliers
- Wire cutters
- Hot glue gun and glue
- Pencil
- Tie an overhand knot in the center of a strip of fabric. Hold the fabric at the knot with two tails together. Twist a short section of the two tails. Wrap it around the knot, which will be the center point of the rosette. Tack in place with glue. Continue wrapping and tacking until rosette is the size you want. Repeat for four more rosettes.
- Lay the rosettes on the felt. Loosely trace with pencil. Cut felt a bit smaller than the traced line. Cut out.
- Glue rosettes to felt. Folding pieces of tulle in half, glue them under and around rosettes. Glue buttons as rosette centers and accents.
- Cut two lengths of chain to make the necklace the needed length. Glue the end of one chain on the back of the necklace piece at the top left. Repeat with other chain at top, back right.
- Use jump rings to attach toggle pieces to loose ends of chain.
- Refer to photo for placement and assembly.
- Cut tulle into 2” x 6” pieces.
- Cut or tear white fabric into 2” strips. The length of the fabric will determine the diameter of the rosette. Make them any size you desire.
- When tacking rosette with glue, use a tiny amount, trying not to let it show on the surface of the rosette.
- when gluing chain to necklace, use a lot of glue. Let it dry before continuing.
- Using a jump ring: grab ends of jump ring at either side of cut with pliers. Twist ring open. String through loop of toggle clasp. Twist tightly closed.
Wednesday, October 12, 2011
Making a Christmas Door Wreath
Here's a couple of videos about making Christmas wreaths. It is getting to be that time of year, so we better get started making our decorations if we want to be ready!
Monday, October 10, 2011
Making your own perfume, cologne, bath splash and scented powder
 Image via WikipediaI was watching an old Carol Duvall show recently and one of the shows was a beautiful young woman who made perfume. I just sat, with my mouth open, as she made perfume, cologne, bath splashes and scented powder right before my eyes.
Here is how she did it:
You will need:
1. Start with 100 proof Vodka--no other kind will work
2. Get you perfume oils either at a body shop or online
3. You need small glass bottles to store your perfume in--if they are clear, plan to cover the bottle with something.
4. Glass eyedroppers
How to do it:
Perfume -- start with 2 ounces of vodka in your small glass bottle; to this add 60 drops of your perfume oil (you will want to mix scents, but only a total of 60 drops); shake it up. Voila!!!
Cologne -- start with 2 ounces of vodka already in your glass bottle; to this add 30 drops of your perfume oil; shake up; and Voila!!!!
Bath Splash -- start with 4 ounces of vodka; to this add 1 teaspoon of glycerine; add drops of food coloring (optional); to all of this add 15 drops of perfume oil and shake up.
Scented powder -- take a 1/4 cup of cornstarch in a bowl; add about a teaspoon of mixed perfume from above; sprinkle it all over and then stir to break up the clumps. You will let this set out in the bowl overnight and in the morning restir the mix. Now you are ready to put your scented powder into a cheese sprinkler glass bottle.
Not bad, huh? I'm off to Whole Foods to pick up some perfume oils and the liquor store for my Vodka!
Here are some hints to help you pick out your oils:
*Earthy – vetiver and patchouli
*Fruity – lemon, grapefruit, lemongrass, bergamot, orange, mandarin, and lime
*Woodsy – cypress, sandalwood, pine, cedar, and cassia
*Floral – rose, violet, jasmine, ylang ylang, neroli, and geranium
*Spicy – cinnamon, black pepper, ginger, juniper, clove, cardamom, and nutmeg
*Herbal – basil, clary sage, chamomile, lavender, rosemary, and peppermint
Wouldn't a whole set of a scent make a wonderful gift for a teacher or co-worker?

Friday, September 30, 2011
Halloween Ribbon Wreath
Here's a beautiful autumn wreath to make to adorn your door, or hang in your window, or on your wall. Such pretty colors and so delicate looking. This was from Styrofoam Crafts.
This designer has another beautiful wreath that I will put up at another time. First, lets get crackin' on making this beauty. Enjoy!
--------------------------------------------------------------------------------------------------------------
 Looking for harvest-season décor you can put up October 1st and keep up through Halloween and Thanksgiving? Look no further - unique sunflower-like effect is gorgeous!
Completion Time - 1 hour
Designer - Kathleen George
Black ultra-fine glitter
Pony beads, one package each: black; orange
Ribbon, 1-1/4" wide: black grosgrain, 1 yd.;
sheer orange, gold, black wire-edged, 5 yds. each
Wire or thin black ribbon, 6" length
Wooden skewer
Scissors
Low-temp glue gun and glue sticks
Thick, white craft glue
Optional: Large cardboard box


This designer has another beautiful wreath that I will put up at another time. First, lets get crackin' on making this beauty. Enjoy!
--------------------------------------------------------------------------------------------------------------
Halloween Ribbon Wreath
Completion Time - 1 hour
Designer - Kathleen George
STYROFOAM™ Brand Foam
Wreath, Round Face, 12" x 2-1/2" x 1"Other Materials
Foam-safe black spray paintBlack ultra-fine glitter
Pony beads, one package each: black; orange
Ribbon, 1-1/4" wide: black grosgrain, 1 yd.;
sheer orange, gold, black wire-edged, 5 yds. each
Wire or thin black ribbon, 6" length
Tools Needed
RulerWooden skewer
Scissors
Low-temp glue gun and glue sticks
Thick, white craft glue
Optional: Large cardboard box
Instructions
- 1. If desired, place foam wreath inside large cardboard box
outdoors or in well-ventilated area. Spray paint wreath black;
sprinkle with glitter while wet. Let dry completely. - 2. Tie grosgrain ribbon into a bow with tails; set aside. Cut
approximately twenty 4" lengths from each sheer ribbon color;
cut more as needed to fill out wreath shape. - 3. Apply dot of glue to opening of a black pony bead;
immediately insert one end of a sheer black ribbon length
through hole until tight. Let dry; trim excess ribbon above
bead. Repeat to bead all black and gold ribbons black; bead
all orange ribbons orange. Let dry. - 4. Refer to photo to join beaded ribbon lengths to wreath.
Beginning just inside wreath opening, dot wreath with glue and
use wooden skewer to push free end of one ribbon length into
foam. Continue adding ribbons in concentric circles around
wreath, cutting and beading more ribbons as needed. Offset
ribbons slightly from circle to circle. - 5. Use fingers to bend ribbon lengths toward outside edge of
wreath as shown. Twist wire ends, or knot thin ribbon ends,
together to create hanging loop. Glue ends into center top
back of wreath.

Subscribe to:
Posts (Atom)
Why Are Orcas Attacking Boats?
Recently I have been reading articles and news about Orcas attacking boats and causing quite a bit of anxiety. Since these whales hunt in p...

-
So far this year is starting out with a bang. I got up and showered and dressed to go to work and at 0545 the hospital calls me and cancels...
-
 I found this recipe here ♥ Apple Pie Cake ♥ 1 cup sugar 2 eggs 1/2 tsp almond extract 4 apples (your choice of variety) cored, peel...
 -
One look at these silly characters explains why Laurie Hardin insists her job doesn't feel like workHere is an article about one of the artists that I follow closely. I love her work and find her ability to be so creatively productive envi...


