Monday, August 1, 2011

Watercolors to go -- from Tip Junkie

Here is a wonderful tutorial for a wonderful idea!  This is something I want to try myself because maybe if I have this handy, I will be able to grab those moments when I feel inspired.  As it is, those moments are simply lost while I try to find things, or set up a place to work, or something. 

This is a great handmade gift to give to any children on your Christmas list, too.  I know I would have loved to receive one of these when I was younger.  Think how many hours of use this little kit will get from the busy and creative imagination of a child.

Hope you like it.  Hope you try it.  If so, leave me a note about the process, won't you?  You can visit the original site here to check out other ideas.

_________________________________________________________________________________


Every winter my dear friend Catherine Newman gives my kids the most inspired gifts- both handmade and boughten.  Last year she gave Ava a fantastic book called An Illustrated Life, a book about illustrated journaling and sketchbooking and it was a huge source of inspiration for her.  When I get her permission, I will post some things she has been working on, but for now I will share with you a little gift that I am currently making for her as she fills her personal sketchbook with beautiful and funny and original work of her own.  There was an idea for this in the book that an artist shared that I have changed a bit but it will allow her to carry water colors with her and as long as she can find some water (usually not difficult) she can transform her black line drawings into something even more spectacular.  And, it's easy, to boot.
  1.  a metal tin (I used a tin that a pair of scissors came in, which was a perfect fit for the "fantastix") polymer clay (sculpey or fimo- go for the soft type).
  2. tubes of watercolors (I went for the cheap type from Michael's for this first try but you could use fancy ones)
  3. Coloring tools such as "fantastix", which are inexpensive and you can find at any art or craft store. They are basically pens without the ink.  The body is filled with a sponge that holds water so you fill it with water and then can use it with the water colors without having a jar of water for your paintbrush.  You could even watercolor in the car!
  4. White metal paint OR a piece of white plastic cut from a tofu or yogurt container that is large enough to fill (or mostly fill) the top of the tin (this is for mixing colors- you want white for that).
  5. A tube of lip balm (you'll see why).
How to make it:
  1. Take one pack of white polymer clay and break in half.  Roll each half into a snake as long as your tin.

Smoosh them so they are flattened along both long sides and then take your lip balm and press 6 wells into each smooshed snake of clay (use the top of the lip balm that is flat).


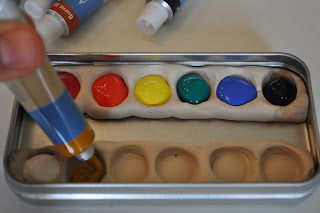
2. Follow the manufacturer's directions and bake the clay inside of the tin.  After this cools, you can fill the wells with paint.
3. Fill the wells with paint.  Tap the whole thing to flatten the paint into the wells, or use something (like a paintbrush) to flatten it.  Allow this to dry and it will be ready to use.


4. Paint the top of the lid with white metal paint or glue in a piece of white plastic to provide a white area to mix colors.

5. Now it is ready to go.  If you need to, tie a piece of string or use a rubberband to keep the lid secure.  

If you can't find a long tin like this one, you could always just carry the color sticks in your pencil/pen bag.


Enhanced by Zemanta

Monday, July 4, 2011

Happy 4th of July! Independence Day!

Here in Austin, as in most of Texas, we are having a fireworks ban due to the fire threat and the drought.  So, here is as close as we will get to seeing any fireworks this year, but I hope your firework display is spectacular to celebrate our nation's independence.  From us here in Texas to you where ever you are, Happy 4th of July!


I hope you and yours have a wonderful, safe, and relaxing holiday!

Tuesday, June 7, 2011

Patriotic Pinwheel Wreath--a tutorial

Here's a fun and easy craft to try with your kids for the upcoming 4th of July holiday.  I found this tutorial on AllFreeHolidayCrafts.  Be sure to click on the link to get to a site for printable pinwheel papers!

--------------------------------------------------------------------------------------------------------------------

Patriotic Pinwheel Wreath


With little time and energy remaining, we still wanted to celebrate this 4th of July weekend somehow. So my wheels were turning and I came up with this simple craft to decorate our door. Here are the 6 supplies we used:

- 1 paper plate, center cut out, 1-inch rim remaining
- hole punch
- scissors
- 8 brass fasteners
- white printer paper
- red construction paper

We made 4 squares from one piece of red construction paper. I found a printable pinwheel template at the Family Fun website, and made pinwheels. We punched holes in each pinwheel, pushed brass fasteners through, and then attached them through 8 evenly-spaced holes I had punched around the plate. Voila--a patriotic pinwheel wreath!


This idea was featured at Tip Junkie in May of  2010 and is also linked to:
SYS Thurs
Enhanced by Zemanta

Monday, May 30, 2011

Chronicling War Through Art

Flags that were placed on gravesites at Fort L...Image via WikipediaLet us remember those who gave all and the people who mourn them.  Today is about remembering sacrifices given so that we can be who we are today. 

We rarely think about the intermingling of art and war, but as far back as we go there have always been artists chronicling the destruction and devastation of war.  Many artists died in war, many gathered information to save lives, many simply chronicled the daily lives of those who live the war.

This article is from the Hartford Courant and is well worth the time it takes to read it.

__________________________________________________________________________________
May 25, 2011Submitted by Michael D. Fay, MFA Student in Illustration, The Hartford Courant
Michael Fay drew this portrait from a photo he took of Lance Cpl. Nicholas G. Ciccone. The image shows Ciccone, a rifleman, immediately after dropping his heavy backpack upon returning from a nine-day battle with the Taliban in the mountains above Kandahar, Afghanistan, in 2002. Ciccone committed suicide after his discharge from the Marines.
Michael D. Fay, of Fredericksburg, Va., is a student in the master of fine arts in illustration program at the University of Hartford. But from 2000 to 2010 Fay, who wrote this Memorial Day weekend piece for iTowns, was one of two combat artists for the U.S. Marine Corps, sketching scenes and soldiers in Iraq and Afghanistan, and in stateside hospitals where they were treated for battle wounds. Fay, 57, has since founded the Joe Bonham project, which coordinates opportunities for artists to embed with soldiers, both overseas and at home as they recover from their injuries. For details about Fay and the Joe Bonham project, visit mdfay1.blogspot.com and joebonhamproject.blogspot.com.


Ex bellum ars: from war, art. This is the motto of The International Society of War Artists.


There's just a handful of working war artists, and none of us have consciously sought the title. For one thing, to become a war artist, you need a war.


During every conflict, from the Civil War and through Vietnam, artists have gone into harm's way to create a visual record of people and places embroiled in conflict. However, each of us has followed different paths leading to the front lines.
My path started as an official combat artist for the National Museum of the Marine Corps.
Here in America, both the press and our armed forces have maintained combat art programs since the Civil War.
Some of our nation's premier artists and illustrators have gone to war to create art. In 1861, Winslow Homer went off for Harper's Weekly as a "special"; his battlefield sketches would be transformed into newspaper images and after the war, he created a series of paintings informing America's perception of the Civil War even up to this day.
WWII experienced the greatest number of artists at war, and Vietnam was recorded by numerous official and unofficial war artists.
Since Vietnam, photography and film have largely overwhelmed traditional fine art in telling the story of war. During the ongoing Global War on Terror, photos and film footage continue to hold pre-eminence in telling the visual story. But a small group of working artists has continued to personally witness combat and create art...[read more]

Enhanced by Zemanta

Thursday, May 26, 2011

Corner Bookmark – Featuring a Kusudama Flower Dangle

I just realized that I haven't posted here in a month!  That is simply not acceptable.  I have been really busy with dog issues and work issues, so I feel like my life has spun out of control a bit.  That said, I apologize for being gone so long.

I still haven't gotten back to my own personal creating; guess I am still in the grip of artist's block.
Since I haven't been at my work desk, I found a really neat tutorial to share here.  If you try this, please let me know what you think of your finished project.  Maybe send me a picture.  I will share them with the author of this tutorial, or you can visit her blog and leave her a comment.

This is a really sweet and elegant bookmark to give to others as a gift.  Know any readers?  They are always needing bookmarks!

-----------------------------------------------------------------------------------------------------------------------------


Supplies – Paper, button, ribbon, white glueStep 1 : Cut five pieces of 2″ square paper
Step 2 : Fold each piece into a petal following this sequence fold in half 


bring flap down
fold flap up


squish-fold the flap open


turn the tip up


fold in half
repeat on other side


bring corners together
Step 3 : Glue the 5 petals together to form a Kusudama flower.
Step 4 : Push the ribbon through the back of the flower and tie a knot. Hid the knot with a button
Step 5 : Attach the other end of the ribbon to a 2.5” square paper with corners folded over
  
Step 6 : Decorate with some ribbon doily if you like (mine is from Basic Grey)
 
 
Here it is all finshed.
 
Hope you have lots of fun making these little bookmarks for yourself and as gifts.


Thank you for sharing with us this great project.  Be sure to check out Sandy’s blog.

Monday, April 25, 2011

I need a break!

After this holiday and my weekend at work, I find I am in serious need of some "Me-time".  I found this video on hand care and I liked it so much I subscribed to the whole series of videos.  They are really good.  I plan on starting at the top and working my way down, pampering myself the whole time!

Wednesday, April 20, 2011

I finished the Easter Swag

Well, I finished, but I have to say I am less than impressed.  I think I just got tired of it and stopped.  Anyway, below is a picture.  I'm taking it to my unit tomorrow and putting it up so at least there will be some evidence that Easter is this weekend for my patients.

If I make this again, I will make the figures larger and probably stuff them lightly with fiberfill before attaching them to the ribbon.  I wish I had more time, I would have loved to decorate the Easter eggs and put blanket stitching around the figures to "pop" them out.

Live and learn.  On to the next project.  Mother's Day is coming.  I don't think I will make anything for this holiday.  But, maybe some paper flowers in a vase set around the unit would be nice.

Anyway, here is the picture of the completed swag:


Enhanced by Zemanta

Why Are Orcas Attacking Boats?

Recently I have been reading articles and news about Orcas attacking boats and causing quite a bit of anxiety.  Since these whales hunt in p...